
Change Your VW Key-Fob Battery Without Damaging the Case
Read the old cell's complete code and photograph its orientation before removal. CR2032 is common, but some older designs may use CR1632 or another battery.
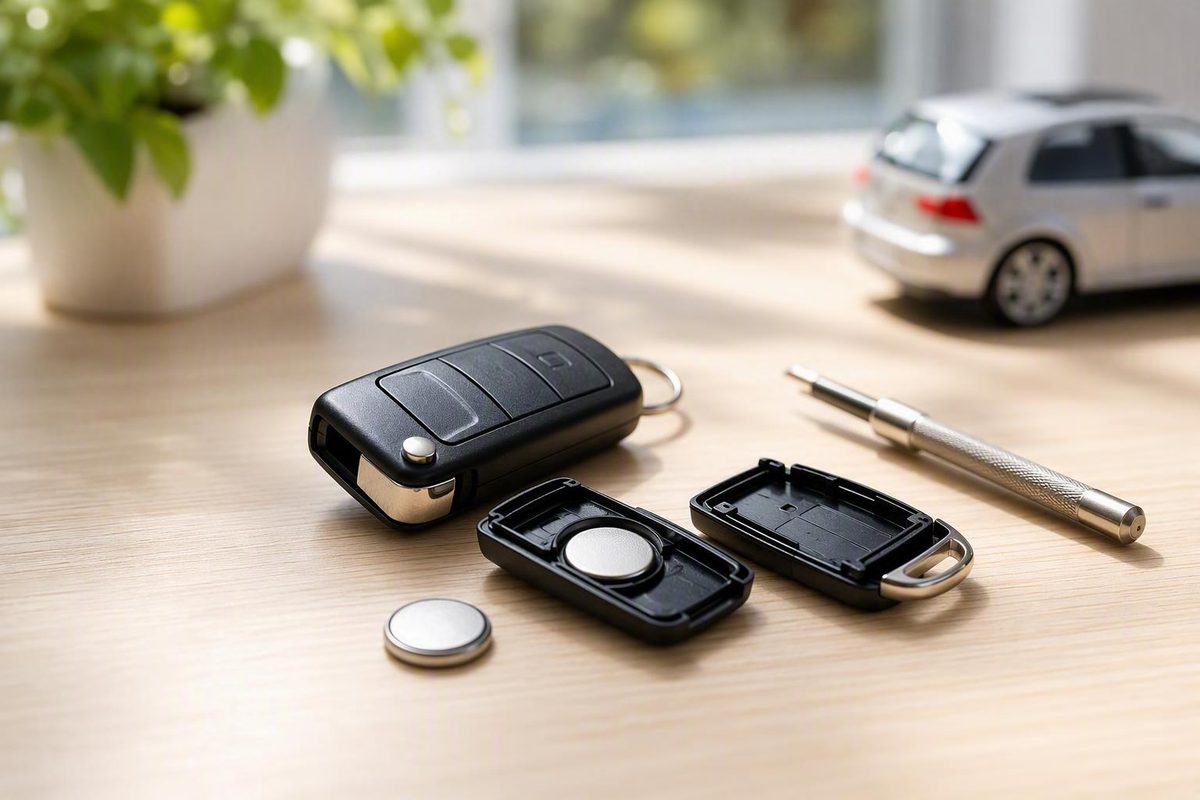
Replacing a Volkswagen key-fob battery is usually a manageable DIY job, but Volkswagen has used several key designs. Battery type, polarity, and opening method can therefore vary by fob.
This is a general, design-aware guide synthesized from Volkswagen dealership guidance—not an official factory procedure for every model, year, market, or key part number. Begin with the exact fob in your hand: identify its removable cover, read the complete code on the installed battery, record the cell’s orientation, and use only light pressure.
The short version: verify before you pry
For a common Volkswagen switchblade or pod-style key:
- Identify the fob style.
- Extend or remove the emergency key, if applicable.
- Find the genuine housing seam or removable battery cover.
- Open the cover gently with your fingers, a plastic pry tool, or a tape-protected small screwdriver.
- Before removing the battery, read its complete code and photograph its orientation.
- Install a fresh battery with the identical code, following the original orientation and any internal polarity markings.
- Confirm that the cell sits flat.
- Align the housing and close it evenly.
- Test every button fitted to the key.
CR2032 is common in many Volkswagen fobs, while some older designs may use CR1632 or another battery. Dealership guidance often associates CR2032 with pod-shaped remotes that have buttons and a retractable emergency key, and CR1632 with some older, conventional-looking keys. Those are provisional clues rather than universal specifications; the code on the installed cell or documentation for the exact key takes priority. Capitol Volkswagen qualifies these battery associations as “most likely” rather than universal.
Do not follow a blanket instruction that the positive side must always face up or always face down. Published procedures differ because they describe different housings. Photograph the old cell before removing it and look for molded + or − markings inside the compartment.
Stop if the housing bends, creaks, or resists light pressure. Do not continue around cracked tabs, loose shell pieces, damaged contacts, or a battery that protrudes and prevents natural closure. Those conditions call for reassessment or key-specific help, not more leverage or pressure. Volkswagen of Daphne similarly advises against forcing a resistant housing and identifies damaged tabs, contacts, and shells as problems a new battery will not correct.
The detailed walkthrough below applies most closely to common retractable-key and pod-style fobs. A newer smart key or less-common housing may release differently.
Confirm that the key-fob battery is actually the problem
A weakening coin cell often causes intermittent symptoms before the remote becomes completely unresponsive. Possible signs include:
- Reduced locking or unlocking range
- Delayed response after pressing a button
- Inconsistent operation
- Needing to press a button repeatedly
- Having to move the key closer to the vehicle
- A low-key-battery dashboard message
These symptoms suggest a weak fob battery but do not prove that the cell is the only fault. A completely unresponsive remote can also result from:
- A backward battery
- The wrong battery type or thickness
- Incorrect seating
-
Poor contact with the battery terminals
-
A cracked shell or broken clip
- Damaged contacts or electronics
If you have a spare key, compare its operation with the problem key. If the spare operates the remote normally, inspect the original fob more closely.
Keep key-fob symptoms separate from vehicle-battery symptoms. The coin cell powers key functions; it does not crank the engine. Slow cranking, repeated clicking, or a broader no-start condition points more strongly toward the vehicle battery or another vehicle-side problem than toward the key’s coin cell.
There is no reliable universal replacement interval for every Volkswagen key. Replace the battery in response to symptoms or a vehicle warning rather than treating a general estimate as a specification.
Once the symptoms reasonably point to the fob, identify the installed battery before buying a replacement or dismantling more of the key than necessary.
Identify the fob and buy the correct battery
The most reliable first step is simple: read the complete code printed on the old cell.
Coin cells may look almost identical while differing in diameter or thickness. Do not identify the battery merely as “the round silver one,” and do not assume it is correct because it drops into the compartment.
Use this order of preference:
- The complete code printed on the installed battery
- Battery and polarity information molded inside the fob
- Documentation for the exact vehicle and key
- Key-specific assistance based on the fob or key part number
- Fob appearance as a provisional clue only
The following pattern can help you prepare, but the battery remains unconfirmed until the installed cell or exact-key documentation verifies it. Dealership guidance associates CR2032 with many pod-style retractable-key fobs and CR1632 with some older conventional-looking keys, while also warning that designs vary. Volkswagen of Marietta presents both battery codes as likely choices tied to broad fob styles, not definitive fitment.
| Visible fob style | Likely but unconfirmed battery | Common opening cue | Mandatory verification |
|---|---|---|---|
| Pod-shaped remote with buttons and a retractable metal key | Often CR2032 | Extend the key and inspect the housing seam or battery cover | Read the complete code on the installed cell |
| Older, conventional-looking switchblade key | Sometimes CR1632 | Main sections may separate before the battery cover comes off | Confirm the installed cell; do not assume all older keys match |
| Newer smart-key housing with a removable emergency key | Varies | Remove the emergency key and inspect the exposed opening | Use exact-key documentation or the old battery marking |
| Unfamiliar or apparently sealed housing | Unknown | Do not assume the whole body splits in half | Obtain key-specific instructions before prying |
If you cannot expose the installed cell safely, consult the owner documentation supplied for the exact vehicle and key or obtain key-specific assistance.
Match every character in the battery code. Do not substitute a cell merely because it has the same visible diameter. Do not add a shim, bend a contact to reach the cell, or squeeze the case shut.
Use particular caution with less-common smart keys and configurations. The available general guidance does not establish one battery or one opening procedure for every Touareg, CC, ID-series, or other Volkswagen key.
Tools and setup for a damage-free battery change
Gather the following:
- A fresh coin cell with the verified code
- A plastic, non-marring pry tool, where suitable
- Alternatively, a small flat-head screwdriver with its tip wrapped in tape
- A clean, stable, well-lit work surface
- A phone or camera for recording the housing and battery orientation
A plastic tool can reduce cosmetic marks. Several dealership procedures use a tape-wrapped small flat-head screwdriver for compatible seam-opening fobs, beginning with fingers where possible before using the protected tool. Heritage Volkswagen describes this protected-screwdriver method for its demonstrated CR2032-style housing.
Remove bulky accessories from the key ring if they interfere with your grip. Work over a clear table rather than carpet, a sink, a vehicle-seat gap, or another area where the battery or a small housing piece could disappear.
Before opening the fob:
- Photograph both exterior sides.
- Note how the emergency key folds, slides, or releases.
- Identify the visible seam or removable cover.
- Position the buttons away from the intended opening point.
When the battery becomes visible, take another photograph before touching it. Capture the complete battery code, the face pointing outward, and any polarity marking inside the compartment.
Use the tool only to create controlled separation at the cover edge. If light pressure does not release the cover, withdraw the tool and reassess the fob design.
Step by step: common switchblade and pod-style VW fobs
This walkthrough applies most closely to common Volkswagen remotes with buttons and a retractable or removable emergency key. It is not guaranteed to fit every smart key.
1. Extend or remove the emergency key
Press the appropriate release and extend the switchblade key. If the housing has a removable emergency key, slide it out using its designated release.
This can expose the opening area or provide room to hold the fob without pressing its buttons. Do not pull the key against resistance unless you have identified the proper release.
2. Locate the designed seam or battery cover
Inspect the full edge of the fob under good light. Look for:
- A consistent gap between the lid and base
- A distinct battery-cover edge
- A release point inside the opening left by the emergency key
- A shallow notch intended for cover removal
On one demonstrated switchblade design, the battery cover sits near a seam below the Volkswagen logo. Older fobs may separate differently, so this location should not be generalized. Emich Volkswagen describes the logo-area seam for its illustrated fob and notes that some older designs require the main sections to separate first.
Use the seam visible on your own housing rather than reproducing the tool position shown for another key.
3. Begin separating the cover
Try your fingers first. If the cover is intended to lift from the seam, you may be able to create a small gap without a tool.
If necessary, place the tip of a plastic pry tool or tape-wrapped screwdriver shallowly into the genuine seam. Twist gently and work evenly if more than one clip must release.
Do not lever against a button, emblem, decorative trim, emergency-key hinge, battery contact, or an edge with no visible seam. Stop if the shell bows, creaks, cracks, or fails to release under light pressure.
4. Record the old battery before removing it
Once the compartment is open, pause.
Read every character printed on the cell. Photograph it in place, note which face points outward, and look for a molded + or − symbol. Observe how the battery sits beneath its retainers.
If the code is difficult to read, change the lighting or viewing angle. If you must remove the battery to see the marking, record its orientation first.
5. Remove the old cell and install the matching replacement
Lift or slide the old battery out through the space intended for removal. Avoid levering against a thin retaining contact.
Compare the old and new cells:
- The complete codes should match.
- Their diameter and thickness should appear identical.
- The replacement should not be dented or damaged.
- Its terminal faces should be clean.
Install the new cell in the same orientation as the old one and in agreement with the compartment markings.
Polarity must be verified for the actual fob. Volkswagen of Marietta’s demonstrated CR2032 procedure specifies positive-side-down, while Frank Boucher Volkswagen’s guide specifies positive-side-up. Those conflicting instructions show why neither direction is safe to generalize across all Volkswagen keys. See the positive-side-down procedure and the positive-side-up procedure.
6. Check the battery seating
The battery should sit flat and securely beneath its intended retaining features. It should not rock, protrude, or fall out during careful handling.
If the new cell sits higher than the old one or prevents the cover from returning to its original position, remove it and recheck the complete code. Do not alter the contacts to make a questionable battery fit.
7. Close the housing evenly
Align the battery cover or housing sections before applying pressure. Make sure the buttons and other components remain correctly positioned.
Press near the clips with even finger pressure until they engage. Then inspect the full perimeter:
- The seam should be consistent.
- No corner should remain raised.
- The cover should not bulge.
- The buttons should move and return normally.
- The emergency key should release, fold, or slide as it did before.
If one area will not close, reopen the housing and check the battery seating and component alignment instead of crushing the case together.
8. Test every equipped function
Stand near the vehicle and test every control fitted to your key. Depending on equipment, these may include:
- Lock
- Unlock
- Trunk or hatch release
- Panic alarm
- Remote start
Not every Volkswagen key has every button. Confirm that the functions present on your fob respond and that operating them does not cause the housing to separate.
When your key does not match the common walkthrough
Older switchblade keys, pod-style remotes, and newer smart-key housings can separate in different ways. Do not assume the entire body splits in half merely because another Volkswagen key does.
On some older designs, the main sections may need to separate before a smaller battery cover can be removed. That general distinction does not identify every clip location or prove that the key contains a particular battery.
For a newer smart key:
- Remove the emergency key if the design permits it.
- Inspect the opening it leaves behind.
- Look for a genuine cover edge, shallow release point, or marked slot.
- Apply light pressure only after confirming that the point is intended for opening.
If the key lacks the seam or cover described in the common walkthrough, stop and consult the applicable vehicle documentation or seek key-specific assistance. The dealership material available for this guide does not establish one release mechanism for every newer Volkswagen smart key.
Emergency unlocking and backup starting are also model-specific. Some keys contain a metal or plastic emergency key, some vehicles conceal the mechanical door lock beneath a removable cap, and backup-start detection points differ. Do not assume that every Volkswagen requires the fob to be placed against the steering column or in another generic location.
Check the documentation for the exact vehicle for:
- How to release the emergency key
- Where the mechanical door lock is located
- Whether a door-handle cap must be removed
- Where to place a key with a depleted battery for backup starting
- Whether a model-specific recognition procedure applies
Battery replacement and emergency access are related but separate subjects. A dead remote battery may not make the entire key unusable, but the correct mechanical-entry and backup-start steps depend on the vehicle and key.
Test the fob and understand programming
Dealership-authored guidance generally indicates that changing the coin cell does not erase the programming of a key that worked before its battery became depleted. This is different from obtaining a complete replacement key, which may require programming.
Keep the distinction clear:
- Changing the coin cell: usually preserves the key’s existing programming.
- Obtaining a complete replacement key: may require vehicle-specific programming.
- A previously working key that remains unresponsive: needs diagnosis before lost programming is assumed.
Use this post-installation test:
- Stand close to the vehicle.
- Press each equipped button once and check for a prompt response.
- Repeat from a modestly greater distance.
- Confirm that every button moves freely.
- Inspect the case for gaps or movement.
- If the vehicle displayed a low-key-battery warning, check whether it clears during normal use.
If a verified fresh battery is installed correctly but the key does not recover, consult model-specific recognition or synchronization guidance. Do not use a generic online “resync” sequence intended for a different Volkswagen generation.
When all equipped buttons work and the shell remains securely closed, the routine battery replacement is complete. A dealer visit is not automatically necessary after a successful battery change.
Troubleshooting a Volkswagen fob that still does not work
Begin with the most reversible causes before considering programming or replacement.
1. Compare the battery codes
Carefully reopen the compartment and compare every character on the old and new cells. A visually similar battery is not sufficient.
If the codes differ, remove the replacement. Do not compensate with pressure, shims, or altered contacts.
2. Check battery freshness
If its condition is uncertain, try another newly obtained battery with the verified code.
If the second battery restores operation, the first cell was the likely immediate cause. If it does not, that still does not prove that the key has lost its programming.
3. Recheck polarity
Compare the installed battery with:
- Your pre-removal photograph
- The original cell’s orientation
- Any molded
+or−marking - Documentation for the exact key
Ignore universal positive-up or positive-down instructions.
4. Inspect seating and normal contact
Confirm that the battery lies flat, sits beneath its normal retainers, and does not move around. Check whether dirt, incorrect thickness, or a displaced component prevents ordinary contact.
Do not bend the metal contacts.
5. Inspect the housing and buttons
Check the entire seam. The housing should be aligned and fully closed without bulging, and every button should move and return normally.
Stop DIY troubleshooting if you find a cracked shell, broken tab, loose housing section, damaged contact, moisture, corrosion, or visible electronic damage. Volkswagen of Daphne recommends further inspection or assistance when correct battery installation does not overcome housing, contact, or electronic problems.
6. Compare key symptoms with vehicle symptoms
If the vehicle starts normally but the remote buttons fail, continue investigating the key, battery installation, or remote electronics.
If the vehicle cranks slowly, clicks repeatedly, or fails to start while other electrical systems also behave abnormally, consider the vehicle battery or another vehicle-side fault.
A spare key can provide context. If the spare works normally, focus attention on the original fob.
7. Know when to stop
Seek key-specific documentation or qualified assistance if:
- The intended opening point remains unclear.
- The shell is cracked.
- Clips are broken.
- Housing sections remain loose.
- A battery contact is bent, detached, or damaged.
- Moisture or corrosion is visible.
- The circuit board appears damaged.
- A verified fresh battery with the correct code, polarity, and seating does not restore operation.
- The case cannot close without force.
It does not automatically prove that programming is required.
If complete key replacement becomes necessary, the new key may need to be programmed to the vehicle. That is a separate process from changing the battery in an existing key.
Frequently asked questions
What battery does a Volkswagen key fob use?
Many Volkswagen key fobs use a CR2032 coin cell, while some older key designs may use CR1632 or another battery. Those associations are qualified rather than universal. Read the complete code on the installed cell or check documentation for the exact key before purchasing a replacement. Capitol Volkswagen lists CR2032 and CR1632 as likely batteries for broad fob styles.
Which side of the VW key-fob battery faces up?
There is no universal answer. Published Volkswagen dealership procedures specify different orientations for different fobs. Record the old cell’s position and follow the polarity markings inside your exact key. If those references are missing or contradictory, obtain key-specific instructions rather than guessing.
Does a Volkswagen key need reprogramming after a battery change?
Usually not. Dealership-authored guidance generally indicates that a routine battery change preserves the programming of a previously working key. A complete replacement key may require programming, while a key that remains unresponsive may need model-specific diagnosis or synchronization guidance.
Why does my VW key fob still not work with a new battery?
The replacement may have the wrong code, be depleted, face the wrong direction, sit incorrectly, or fail to make normal contact. The housing may also be misaligned, a button may be trapped, or the shell, contacts, or electronics may be damaged.
Recheck the easiest causes in this order: battery code, freshness, polarity, seating, case alignment, and button movement. If those checks do not reveal the problem, compare the fob with a spare key and consider key-specific or vehicle-side diagnosis.
How can I unlock or start my Volkswagen if the fob battery is dead?
Many Volkswagen keys include an emergency key for mechanical entry, but its release method and the location of the door lock vary. Backup-start detection points are also model-specific.
Consult the documentation for the exact vehicle and key. Do not assume that every Volkswagen uses a concealed lock in the same location or starts by holding the fob against the steering column.
Before finishing, verify the essentials:
- Match the complete battery code.
- Preserve the original polarity.
- Use only light pressure at a genuine seam or cover release.
- Seat the battery flat and securely.
- Close the housing evenly, without gaps or force.
- Test every equipped button.
The avoidable errors are straightforward: assuming CR2032 fits every Volkswagen, applying one polarity rule to every key, and forcing a housing designed to open differently. If a verified fresh battery and correct installation do not restore operation—or if the shell, clips, or contacts are damaged—the next step is key-specific documentation or qualified assistance, not more force.